Laughing Hyena
  • Home
  • Hyena Games
  • Esports
  • NFT Gaming
  • Crypto Trends
  • Game Reviews
  • Game Updates
  • GameFi Guides
  • Shop
Tag:

Laser

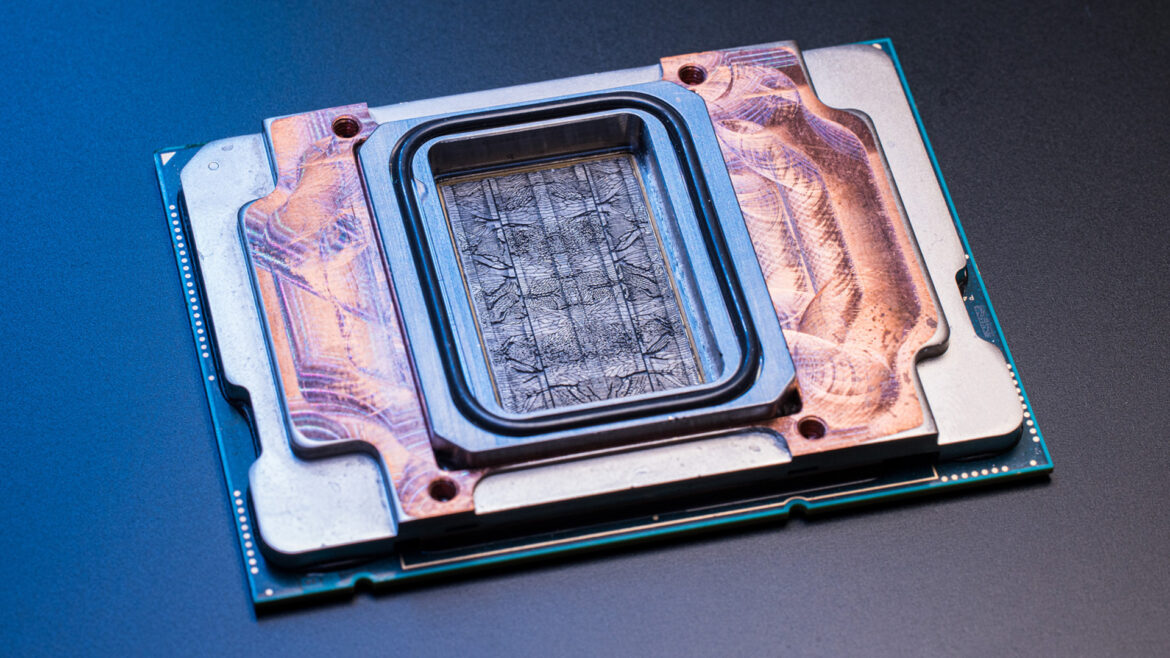
An image of an experimental cooling solution developed by Microsoft, that uses microfluidics to get coolant directly into the processor's silicon.
Product Reviews

Microsoft is resorting to laser etching AI-designed cooling channels directly into data center chips to tame their massive heat

by admin September 24, 2025


Introducing microfluidic cooling: a breakthrough in chip cooling technology – YouTube

Watch On

If you think the power consumption of today’s gaming graphics cards is bad, it’s nothing compared to how energy the massive processors in AI and data systems use. All that power ends up as heat, resulting in chip cooling being a serious challenge. Microsoft reckons it has a great solution, though, and it’s all about getting water into the processors themselves.

The most complex direct-die, liquid cooling loops you’ll see in a gaming PC all involve using a chamber that mounts on top of the CPU. At no point does the coolant ever touch the chip directly. In a recently published blog, Microsoft explains how it has developed a system that does precisely that.

By etching the surface of the processor die with an intricate pattern of tiny channels, water can then be pumped directly into the silicon itself, albeit to a very shallow depth.


Related articles

The keyword to describe this is microfluidics, a technology that’s been around for many decades, and if the history of consumer tech is anything to go by, it’ll be a phrase plastered across every CPU cooler within a couple of years (though not actually do anything).

This might all just seem like Microsoft is cutting a few grooves into the chip and having water to flow through it, but it’s far more complicated than that. For a start, the channels themselves are no wider than a human hair, and they’re not just simple lines either. Microsoft employed the services of Swiss firm Corintis, which used AI to determine the best pattern for maximum heat transfer.

(Image credit: Microsoft)

The end result is a network of microchannels that genuinely look organic, though at first glance, you’d be forgiven for thinking the complex patterns were just manufacturing defects. It certainly looks super cool (pun very much intended).

Microsoft claims the tech is up to three times more effective at removing heat from a massive AI GPU than a traditional cold plate (aka waterblock), citing a 65% reduction in the maximum temperature rise of the silicon.

Keep up to date with the most important stories and the best deals, as picked by the PC Gamer team.

Since all the coolant transfer apparatus doesn’t need to be right on top of the microchannels, the system can also be applied to stacked chips, with each one etched before mounting. This way, each die within the stack is cooled individually, meaning they can operate closer to their maximum specifications than with a normal cold plate.

Take AMD’s X3D processors, for example. These all have one stacked chip underneath the heatsink: a Core Complex Die (CCD) bonded to a 3D V-Cache die. Each one acts as a thermal barrier to the other, though the CCD does generate much more heat than the cache die. If these could be both cooled via microfluidics, you’d be able to operate them both at higher clock speeds.

Of course, such complex tech isn’t cheap to develop or implement, and the likelihood of it ever appearing at the consumer level is very slim. But I wouldn’t be surprised if somebody takes an RTX 5090, rips off the heatsink, and swaps it for a homebrewed microfluidic cooler.

There again, if ramping up power consumption is the only way AMD, Intel, and Nvidia can keep improving chip performance, perhaps we might see etched processors and direct-die cooling being standard fare in our gaming PCs. After all, it wasn’t that long ago when heatpipes and vapour chambers were phrases never to be uttered by a PC component manufacturer, but now they’re in coolers of every kind.

Best CPU coolers 2025

All our current recommendations


Source link

September 24, 2025 0 comments
0 FacebookTwitterPinterestEmail
Here are 239 imaginative, daft or broken falling block games featuring laser drones, LocoRocos and playing cards
Game Updates

Here are 239 imaginative, daft or broken falling block games featuring laser drones, LocoRocos and playing cards

by admin September 22, 2025


It is written that when the Sumerian king Gilgamesh first beheld the gleaming ramparts of Uruk‐Haven, many centuries ago, he said unto his architects: “be sure to save up gaps for those long straight ones, and try your best to start a multiplier”. But then Gilgamesh realised that, by means of temporal fluctuations too nonsensical to explain, he was actually looking at the submissions page for Falling Block Jam 2025, the latest Itch.io “make a thing with a theme” festival, which ran from last week till today.


Falling block games! Such a simple concept, capable of so many perversions. I have played a handful of the jam’s 239 entries and found them to be enjoyable, if often rudimentary. As is the style round these parts, I will now try to briefly communicate their enjoyableness to you using words. This is honestly going to be quite difficult, because I keep seeing another entry I want to try.


A pretty one to start: Bloquecitos is a Tetrislike with real-time physics, and blocks that merge to create different-shaped blocks when you match their patterns. It’s a crafty rejig of the developer’s previous Pancitomerge. I’m fond of the mosaic tile patterns, and I like engineering cascades by merging two blocks so that others tumble together.

Image credit: Fáyer / Joven Paul / Rock Paper Shotgun

This Side Up, meanwhile, trades the “falling” component of the “falling block” genre for a gradually retreating 3D camera. You’ve got a shipping crate and you’re trying to fill it with vintage household objects such as cacti, cathode-ray televisions, Nintendo Gamecubes, and lizard tanks.

I strongly relate to this one inasmuch as I had a bunch of stuff in lock-up during a flat move last year. There’s a dark art to filling shipping crates so as to optimise both storage space and retrievability. I do not claim to have mastered this art. After all, I managed to divide up all my paired belongings between separate crates. I had left socks and saucepans in one box, right socks and saucepan lids in another. Get ye behind me, This Side Up! You are bringing back traumatic memories.

Image credit: Apotheum

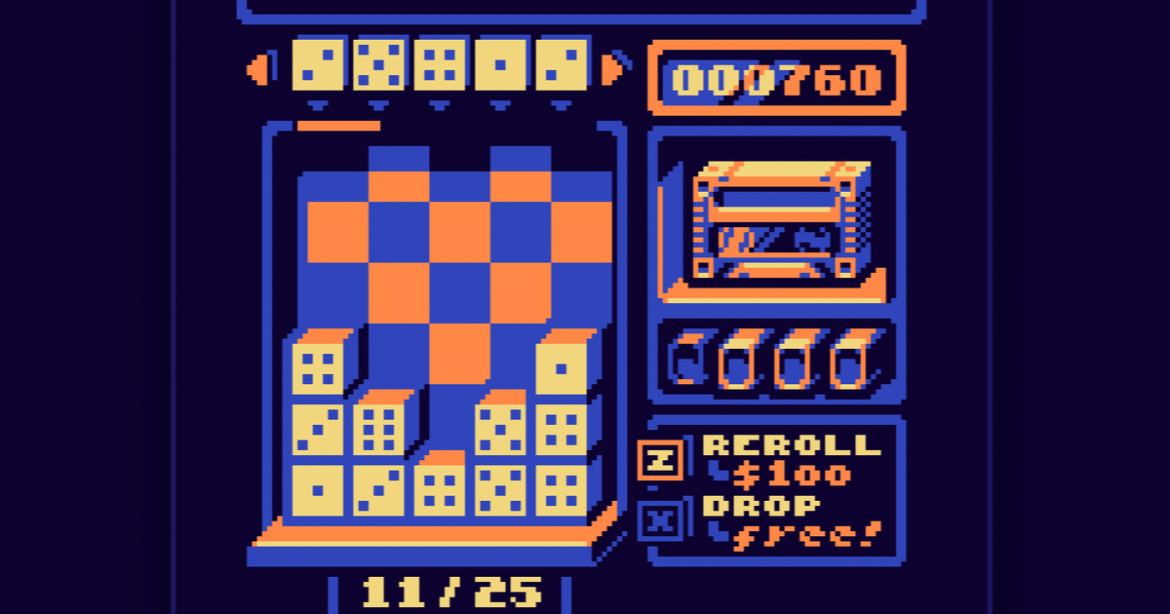
Professor Gambler’s Bone Scrambler is a falling block game born of the fateful realisation that a thrown die is a kind of falling block. Each turn, it rolls out a line of dice. You then slide the line horizontally to match the blocks below and create combos, or spend points to reroll the set. How do you earn points? From combos. It’s got nice chiptune aesthetics, as you might expect from a game that has also been submitted to GBJAM 13.


A Pico-8 one next. In Recycled Blocks, you control a little laser drone that has to sculpt blocks as they fall to complete work orders and remove them from the board. I found the control scheme a bit confusing, but I love the concept. Ditto the self-explanatory Circuit Makers.

Jelly Well, meanwhile, gets two thumbs up for its subliminal hatred of LocoRocos and for its soundscape of human mouth noises. More of this kind of thing, please. Call of Duty games would sell twice as much if all the gun effects consisted of voice actors yelling “bang”. I would hire Sir Anthony Hopkins to voice an AK47, myself.

Image credit: Walaber Entertainment


Simply scrolling the Falling Block Jam submission feed makes me feel as though I’m losing badly at Tetris, so I’ll resist the urge to write up any more. OK, one more, but only because it doesn’t require a computer: Doctor Vs Virus is a table-top falling block game you can play with a standard deck of cards.

If you see any others you like, please rotate and slide them dextrously into the comments below. Why not see if you can form a line with people recommending the same game – I’ll try to add some block-clearing score attack functionality to our moderation software.


Source link

September 22, 2025 0 comments
0 FacebookTwitterPinterestEmail
xTool F2 Ultra
Product Reviews

xTool F2 Ultra laser engraver review

by admin September 6, 2025


Why you can trust TechRadar


We spend hours testing every product or service we review, so you can be sure you’re buying the best. Find out more about how we test.

I’ve tested out a number of xTool laser cutters before, and I’ve always walked away impressed.

Whether it’s the feature-rich, easy-to-use xTool P2 or the precise xTool S1, I’ve always found the units to be innovative and accurate, ranking them among the best laser engravers and cutters around.

So, I was excited to get my hands on the xTool F2 Ultra. And after some comprehensive testing, let me tell you, this one is in a league of its own.

(Image credit: Alastair Jennings)

The xTool F2 Ultra follows on from the impressive F1 but boosts speed, power and design to offer one of the most powerful yet easy-to-use desktop laser engravers on the market. While the working area might be relatively small, the fact that it features a 60W MOPA fibre laser enabling you to engrave, emboss and cut various metals is a feature that’s rather unique. Then there’s the fact that this is coupled with a more standard 20W diode laser for non-metallic materials, such as wood, meaning that if you own a small business, it offers a powerful tool that will enable you to create and customise a wide range of products.

  • xTool F2 Ultra at Amazon for $5,499

While machines like this have been available in the past, they’ve often been ultra-complex and required additional software to handle the speed and power of the fibre laser. However, with integrated software and streamlined workflow, it is pretty much unmatched by any other system I’ve used. I’m pretty confident that even a complete beginner would be able to get up and running with the F2 Ultra.

From the outset, I was impressed not just by the user setup but also by how quick and easy it was to use the xTool software. You just need to select your design, place it over the material in the software, select the material type from the library, then select engrave, cut or emboss before hitting go and watching the design appear within seconds.

The price point of this machine really reflects the quality and speed of what is possible, with the Galvo system enabling speeds of up to 15,000 mm/s and the smart dual-camera setup helping you accurately position items in the machine. It’s impressive what you can do and create in very little time.

Sign up to the TechRadar Pro newsletter to get all the top news, opinion, features and guidance your business needs to succeed!

Many of the more complex manual setup procedures are removed, with the machine essentially taking over everything, such as focusing automatically. There’s just a small alignment procedure at the beginning of the setup process, but once that’s done, aside from dialling in material and positioning your designs, the machine takes care of everything else.

I’ve used quite a few dual-fibre and diode laser machines in the last year, and while I’m always impressed with what is achievable, there’s usually a bit of tuning and fiddling with calibration and configuring software like LightBurn to accurately mark or engrave. However, here the software aligns everything; you just push the green bar on the control panel, and the machine takes care of the rest.

With the F1, I was impressed by the speed, utility and flexibility of the machine, but the F2 Ultra is in another league, obviously reflected in the price point. Compared with any other system on the market, the F2 Ultra, especially when coupled with the conveyor belt, offers a huge amount of options and possibilities. For any small business dealing with laser engraving and embossing, there’s now only one machine, the F2 Ultra.

xTool F2 Ultra: Price & availability

The xTool F2 Ultra is available on xTool’s official site – it’s priced at $4999 in the US and £6029 in the UK.

I’m also seeing the unit retailing for $5499 on Amazon.com. However, it doesn’t appear to be available on Amazon.co.uk at the time of review.

xTool F2 Ultra: Design

Specs

Laser Technology: Dual-laser: 60W MOPA fibre + 20W blue diode
Work Area: 220 × 220 mm (expandable to 220 × 500 mm with conveyor)
Spot Size: 0.03 × 0.03 mm (fibre); 0.08 × 0.06 mm (diode)
Engraving Speed: Up to 15,000 mm/s
Positioning Accuracy: Up to 0.0001 mm
Camera System: Dual 48 MP with AI recognition
Dimensions: 730 × 320 × 265 mm
Weight: 20 kg
Supported Materials: Metals, wood, acrylic, leather, glass, ceramics, plastic
Safety: Fully enclosed with auto-shutdown and fire detection
Software: xTool Creative Space + LightBurn compatible

One of the standout features of the xTool products is just how well-designed they are. This is from a company that, a few years ago, was producing simple open-frame laser cutting machines with a distinct DIY feel. Those machines are far removed from the F2, which is highly refined and of exceptionally high quality, aimed at small to medium-sized businesses rather than the casual consumer or prosumer.

While the machine itself is relatively compact with a footprint that will sit perfectly on a desktop, it has a high-quality build that reflects not only its price point but also its suitability for years of use.

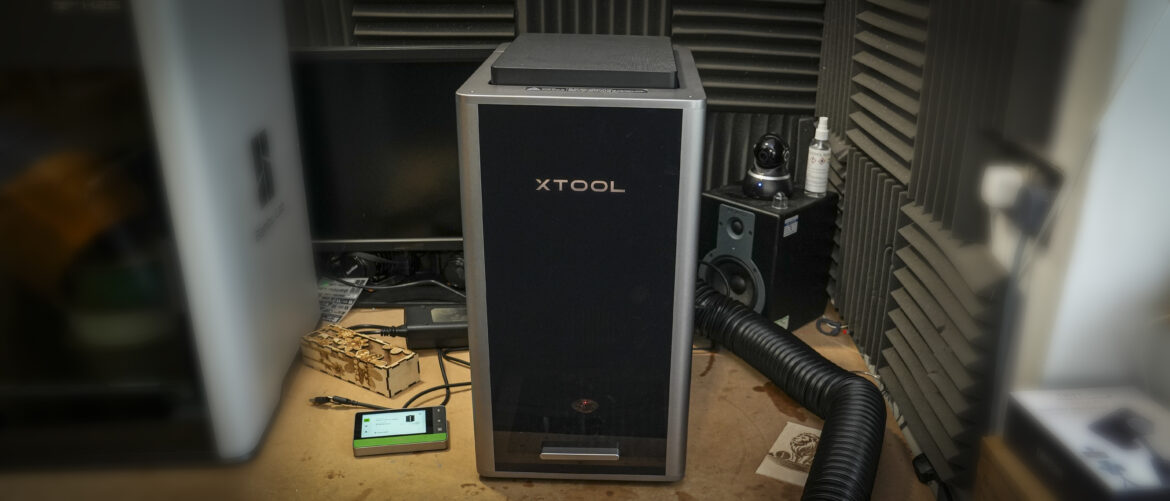
The machine is relatively simple, with a slide-up enclosure that encloses the working area. If you need to have it open for larger materials, that’s possible. There’s also the ability to add an air filter to extract fumes, and as you’d expect with a professional-level machine, there’s a kill switch and a decent touchscreen display to monitor the process and access many settings.

As with many other laser engravers and CNC machines, most interaction is done through complementary software. xTool provides its own ecosystem, which is one of the best on the market, streamlined and easy to use. Unlike some other fibre lasers, there’s no need to purchase expensive extra software or plug-ins. Once you’ve paid (admittedly a lot) for the F2 Ultra, it should work out of the box and be set up within about 10 to 15 minutes.

The design is also clever in that you can use it as a fully enclosed system with smart safety features like emergency stop, flame detection, and automatic shutdown when open, or bypass some of those for conveyor belt use with larger objects.

In terms of size and weight, it comes in at roughly 20 kg and measures 730 × 320 × 265 mm. This smallish footprint will sit comfortably on your desktop, though you do need to allow for the machine’s height and a small side control panel.

If you’re using the conveyor belt, you’ll need even more space. It’s an optional extra, but if you’re planning to use it, it’s well worth having a full workbench left free to easily operate the machine.

On initial setup, I used the USB connection to sync with my laptop. After initial calibration, I switched to the Wi-Fi connection, which I found strong and reliable, even on my underpowered workshop network.

The overall build is premium and extremely sturdy. The two internal cameras and full autofocus add to the ease of use and high-end feel. However, compared with something like the ComMarker B6, this is a far larger and heavier machine.

(Image credit: Alastair Jennings)

xTool F2 Ultra: Features

The F2 Ultra is an interesting machine as it combines two laser types in one enclosed engraver. The first is a powerful 60W MOPA fibre laser used for engraving, embossing and cutting thinner metals, the second laser is a 20W diode laser used for cutting and engraving organic materials such as leather and wood.

Not long ago, it was unusual to find both lasers in one machine, but as we saw with the ACMER P3, combining the two is becoming more common. The big difference between the Atomstack P3 and the xTool F2 Ultra, aside from the price, is the build area. The ACMER P3 is designed for far larger objects, while the F2 Ultra features a far more powerful fibre laser and is designed for more intricate work. In terms of product design and finish, the F2 Ultra is in another league.

One of the biggest advantages of having a dual-laser system is that it enables automatic switching between laser types depending on the material. In the past, other machines with dual lasers required you to manually swap out the tool heads, fibre or diode. We’ve seen this before with older xTool and Creality machines.

The fibre laser not only cuts through thin metals but also enables colourful anodisation of aluminium and steel. The diode laser can cut through relatively thick organic materials, ideal for a 3mm base ply, and in some cases up to 20mm in thickness.

In terms of laser power, the MOPA fibre laser for metals comes in at 60W, which is extremely powerful for this type of machine. The 20W blue diode laser is mid-range but perfectly suited to the small platform and build area the F2 Ultra offers.

When it comes to engraving speed, the fibre laser uses Galvo scanning technology, enabling speeds up to 15,000 mm/s. This sounds fast, and when you see it in action, it is. You can engrave a MacBook Pro in a matter of seconds, although, while the temptation was there to do so in this review, I held off, at least for the moment.

The more I used the machine, the more impressed I became with its features. The dual 48MP cameras enable AI-powered alignment, making a real difference to positioning. The cameras feed into the xTool software, allowing for precise placement on the material. With a positioning accuracy of up to 0.0001 mm, even the finest materials are handled with extreme precision.

While the working area of the F2 Ultra is smaller than many large-scale engravers, it’s designed for small businesses looking to engrave and cut smaller items. The base size is 220 × 220 mm, which suits a wide variety of objects. If more space is needed, a conveyor accessory expands this to 220 × 500 mm.

One of the areas that excited me most was the precision; the fibre laser offers a spot size of 0.03 × 0.03 mm and the diode laser 0.08 × 0.06 mm, allowing for extremely fine detail.

Thanks to the dual-laser setup, there’s decent material compatibility, most notably stainless steel, aluminium, titanium, gold, and even silver. With very thin materials, it’s possible to cut as well as engrave metal, which is rare even among fibre laser engravers, but that additional power boosts that potential.

The machine also handles all the usual materials, acrylic, leather, rubber, ceramics, and glass (though some surfaces may require preparation). It’s designed for precision, not bulk processing, and while cheaper machines exist for large-scale cutting, the F2 Ultra excels in high-quality, fine-detail work.

Supporting that precision are smart features like smart focus, autofocus, and automatic Z-axis adjustment. Unlike other engravers, where you manually enter material thickness or use gauges, this machine does it all for you.

The fully enclosed enclosure offers Class 1 safety so that you can be sure to be protected from those high-power lasers, which, if you’re using this in a small workshop or shop, is well worth considering. Built-in sensors include flame detection, which triggered several times during testing when pushing the machine’s limits of power, and an emergency stop is also available.

(Image credit: Alastair Jennings)

xTool also supplied a smoke filtration unit, which connects to the machine and keeps fumes to a minimum. This is an optional extra, but if you’re spending on the F2 Ultra, it’s well worth the investment.

Although the F2 Ultra is well above many machines I’ve tested in terms of quality, it still supports popular laser engraver accessories, including the rotary tool, conveyor feeder, and air-assist smoke purifier, all of which enhance cut quality and streamline workflow.

As for software, I really like xTool Creative Space. It’s fully featured, with helpful tools and instructions, and is very easy to use for laying out designs. If you’re a more advanced user, the machine is fully compatible with LightBurn, although you’ll need the Galvo plug-in. Once installed, all the cameras and configurations work through that as well.

xTool F2 Ultra: Performance

Starting out with the xTool F2 Ultra, this is one of the easiest machines I’ve come across to set up and use of its type. While the machine is relatively large, its actual footprint is quite compact, meaning it sits comfortably on your work surface without taking up too much space. It’s more vertical than wide or deep.

Once positioned, with the dongle and control panel plugged in, you can switch on the machine, and it runs through its initial checks, ready for calibration. I connected it to my MacBook Air via USB and used the Creative Space software to complete the alignment and calibration process. This involved placing a piece of material inside, clicking ‘next’, and allowing the software to mark two points, which were used to align everything automatically. Once complete, the machine was ready to go.

In the box with the review sample were a few test materials. Over a three-hour period, I cut, engraved, and embossed various items, from metals to wood and leather, and was impressed by how quick and easy the machine was to use. I liked that the fully enclosed nature meant I could just pull down the lid, hit start in the software, then press the green bar on the control panel and watch the engraving, cut, or emboss process begin.

In almost all cases, the output quality was excellent. Only the first few materials required some adjustment as I got a feel for the machine’s power. For example, my first attempt at engraving a 3mm base ply used too much power and burned the material to ash. On the second run, the result was far better. The standard 20W diode laser was very capable, and with the air assist and smoke filter extracting fumes, the quality and precision of the cut were impressive.

One thing I really liked, whether working with metal, wood, or leather, was the camera-assisted positioning. Through xTool Creative Space, you can capture a live image of the material on the work area and place your design directly on top. This allows for near-100% accurate placement.

If you’re unsure about positioning, you can also click the ‘frame’ button, which projects your design outline onto the material inside the machine. This projection is sharp and precise, allowing for fine adjustments before committing to a cut or engraving.

As with any laser engraver, I ran a series of test passes on different materials, especially metals and woods, to get a feel for the required power and speed settings for both diode and fibre lasers. Although the 20W diode laser is mid-range by today’s standards, its power and accuracy deliver clean, high-quality cuts through 3mm base ply.

Switching to the fibre laser highlighted just how capable this machine is. The 60W power output provided more engraving depth than I’ve seen in other fibre lasers I’ve tested, and the speed and accuracy are unmatched so far.

For the first few engravings, I used sample files included with the software, most of which completed in a few seconds. Even though I know these machines are fast, the speed of the xTool F2 Ultra still surprised me.

One of my early projects was engraving a set of dog tags for my dog and a few friends. Usually, this might take a few attempts to get right, but here, the accuracy and speed were such that each tag was engraved in under five seconds.

What’s more, by laying out a batch of tags on the surface and applying different text to each through the software, I was able to engrave up to 20 tags in one go and faster than anything I’ve used before.

The more I used the fibre laser, the more intuitive the software became. Unlike other fibre lasers that take time to learn and have complex configuration steps, with the F2 Ultra, I felt confident within an hour, engraving coins included in the material pack with intricate designs.

The small work area is ideal for this kind of precision engraving. But of course, this is a dual-laser machine, and I wanted to test the diode laser on more materials. I engraved the cover of a book, lowering the laser power to about 5% and increasing the speed. After a few test dots to fine-tune power levels, I ran the full design, which was completed in under a minute with excellent quality.

As I continued engraving tools, creating more coasters and keyrings, the one thing that stood out was the precision of the engravings. When using my own materials, I learned that careful attention to power and speed settings was essential. My first batch of coasters burned quickly, but a test pass and adjustment solved that.

The quality of the lines, especially with air assist and the filter removing fumes, was excellent. That said, the limited work area is noticeable. This machine is built for precision tasks, not large-scale projects. For that, something like the xTool P2 would be more appropriate.

All this use was good and standard, but the point of the F2 Ultra is that it’s far more, especially with the ability to emboss metal. How you do this isn’t exactly straightforward initially, as there’s a little delving into the menu; the same is the case when using the Rotary attachment. Essentially, in the XCS software, you click the Select Processing Mode, then scroll down past the “Roller – Use Rotory attachment”, “Use Converyor Large” to the “Emboss” option. Once selected, you can then start to lay out your chosen design.

The next step is to select the material, in this case, a brass coin blank supplied by xTool. This is selected from the material menu; here, you need to select “More Materials”, type in Brass and 1.57″ (40mm) Blank Commemorative Coins Brass” will appear. From here, you can select the material, select the F2 Ultra, then click “Add to XCS”. Then click back onto the material and select the “1.57” (40mm) Blank Commemorative Coins Brass.

Now the coin can be placed into the F2 Ultra, and by clicking “Refresh Background” then “Auto Measure”, the coin will appear on the screen, ready for you to position the design.

The design is the next stage of processing, as a straight image won’t get you the emboss effect, and a depth map needs to be created.

To do this, you click the “Ai” icon, select “Image Processing”, and select “Embossment”. You’re then given the option to upload your image, select the Emboss type, and then click “Generate” Once the processing is finished, you can drag and drop the coin design onto the workspace and over the preview of the coin. Once you’re happy, you can click process, and the embossing will start. For most projects, this process is considerably slower than general engraving and can take well over an hour; however, the end results are incredible, especially once polished and finished off.

(Image credit: Alastair Jennings)

It’s worth noting that the depth map creation isn’t an exact science, and there’s no way to adjust the map, but after a while and with the 3D preview, you start to get an idea of what works and what doesn’t.

By the end of the test, I was genuinely impressed by the fibre laser, which is clearly the core of the F2 Ultra. The inclusion of a powerful diode laser fine-tuned for detailed work adds even more versatility, ideal for small businesses.

It’s clear this machine is designed for small to medium-sized businesses that rely on laser engraving, whether to create and customise products or for crafts requiring precision, such as jewellery work. It offers a level of detail and reliability that many other fibre and diode systems cannot match.

xTool F2 Ultra: Final verdict

The xTool F2 Ultra is one of the best fibre laser engravers on the market, with a premium build and a product-designed enclosure that makes it an ideal option for many small to medium-sized businesses. It’s perfect for small-scale production, customisation, and any business that needs to laser engrave a wide range of surfaces. What it is not is a large-scale laser engraver for oversized projects. This is focused on absolute precision.

The inclusion of two lasers and the dual cameras for AI alignment onto smaller objects helps ensure ultimate precision. If you need to do batch engraving, it speeds up the entire process, essentially handling much of the setup and configuration for you.

After using it for a month, this is by far the best fibre laser engraver I’ve tested. The major downside is the cost. The base machine is expensive, and once you add in the conveyor, rotary tool, and smoke filtration units, though combo packs are available from xTool, it still adds up to several thousand pounds, which is a considerable investment for a small business.

(Image credit: Alastair Jennings)

However, this is a professional machine. It’s not just a starting point; it’s a system you can build your business around. Its precision and quality are high-end, and if you’re looking for a solid, reliable machine to support or expand your business, the F2 Ultra is an obvious choice.

What I also appreciate is how well xTool Creative Space is designed. It’s robust, intuitive, and simple to use. While you can use third-party options like LightBurn, which offers more advanced control, you will need the Galvo plug-in and some setup time to get everything calibrated properly.

For experienced users, this opens up even more potential; however, if you’re a small business looking for a fast and versatile laser engraver, the F2 Ultra stands out as the best option on the market. Paired with one of xTool’s straight diode machines, it gives you a powerful ecosystem capable of handling a huge variety of projects with ease and speed, making it a sound investment.

Swipe to scroll horizontally

Value:

Premium machine for pro users with deep pockets

4

Design:

Durable, enclosed, and workbench-friendly layout

4.5

Features

Dual-laser + AI + Galvo = professional flexibility

5

Performance

Flawless output across materials and batch work

5

Total

Among the best all-in-one engravers available today

5

Buy it if…

Don’t buy it if…

For more crafting tech, I’ve tested and reviewed all the best 3D printers.

xTool F2 Ultra: Price Comparison


Source link

September 6, 2025 0 comments
0 FacebookTwitterPinterestEmail

Categories

  • Crypto Trends (1,098)
  • Esports (800)
  • Game Reviews (772)
  • Game Updates (906)
  • GameFi Guides (1,058)
  • Gaming Gear (960)
  • NFT Gaming (1,079)
  • Product Reviews (960)

Recent Posts

  • This 5-Star Dell Laptop Bundle (64GB RAM, 2TB SSD) Sees 72% Cut, From Above MacBook Pricing to Practically a Steal
  • Blue Protocol: Star Resonance is finally out in the west and off to a strong start on Steam, but was the MMORPG worth the wait?
  • How to Unblock OpenAI’s Sora 2 If You’re Outside the US and Canada
  • Final Fantasy 7 Remake and Rebirth finally available as physical double pack on PS5
  • The 10 Most Valuable Cards

Recent Posts

  • This 5-Star Dell Laptop Bundle (64GB RAM, 2TB SSD) Sees 72% Cut, From Above MacBook Pricing to Practically a Steal

    October 10, 2025
  • Blue Protocol: Star Resonance is finally out in the west and off to a strong start on Steam, but was the MMORPG worth the wait?

    October 10, 2025
  • How to Unblock OpenAI’s Sora 2 If You’re Outside the US and Canada

    October 10, 2025
  • Final Fantasy 7 Remake and Rebirth finally available as physical double pack on PS5

    October 10, 2025
  • The 10 Most Valuable Cards

    October 10, 2025

Newsletter

About me

Welcome to Laughinghyena.io, your ultimate destination for the latest in blockchain gaming and gaming products. We’re passionate about the future of gaming, where decentralized technology empowers players to own, trade, and thrive in virtual worlds.

Recent Posts

  • This 5-Star Dell Laptop Bundle (64GB RAM, 2TB SSD) Sees 72% Cut, From Above MacBook Pricing to Practically a Steal

    October 10, 2025
  • Blue Protocol: Star Resonance is finally out in the west and off to a strong start on Steam, but was the MMORPG worth the wait?

    October 10, 2025

Newsletter

@2025 laughinghyena- All Right Reserved. Designed and Developed by Pro


Back To Top
Laughing Hyena
  • Home
  • Hyena Games
  • Esports
  • NFT Gaming
  • Crypto Trends
  • Game Reviews
  • Game Updates
  • GameFi Guides
  • Shop

Shopping Cart

Close

No products in the cart.

Close